
What there is
and what to click

Here's what there is, working from left to right:
A 'Title' button with the cReate logo (tiny, I know) and text. It doesn't do anything. YET. Contact me and tell me what it should do!
Second, we have the button to create a Medium stone grey, 3x3x3, anchored, ConCollide part that is not locked, smooth on all surfaces, with a Symmetrical FormFactor. It appears wherever the camera is looking.
Third, we have a button to create a neutral, 6x1.2x6 spawn, decal on top, welds on all sides bar the top, which is smooth. All other settings are default. It has inside it a decal, which is the standard spawn location decal. Team is set to neutral. What will you use your spawn for?
Next, we have the create mesh button. It creates the 3 meshes; Special, Block, and Cylinder. It creates them in Workspace, ready to be dragged into parts. Default settings for meshes.
Next up, a button to instantly create a script. It is created in Workspace, is blank and ready for editing.
Sixth, we have a button to create a blank, textless Message and Hint in the Workspace. Default settings.
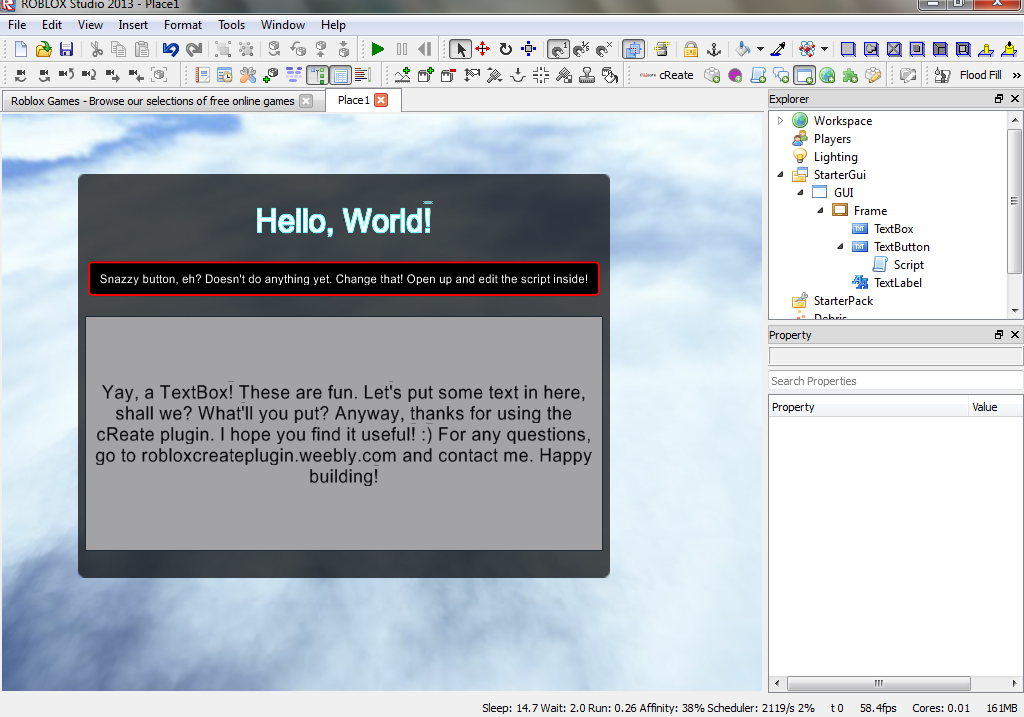
Seventh, and this is cool, a button to create the basis of a GUI. It will create a ScreenGui object within the StarterGui. Within that will be a Frame, and within that will be a TextBox. There is also, in the frame, a TextButton, with a script for editing inside There is also a TextLabel. What's really cool, with recent updates, is that I have made it so it looks a little like this.
Now we have ourselves a great little button to create a team! It creates it in the Teams folder, and if there isn't one already, it'll create one! Settings are default, apart from the color, which is set to a random color for you. Have fun using this in conjunction with the Spawn Creator! Please thank ROBLOX user maxlocke99 for this great little tool!
Next up is a Skybox selector/creator. It pops up with a GUI offering you 4 cool Skybox's, plus the standard. More to come. Contact me with your own Skybox submissions!
Now, (and thank ROBLOX user AntiBoomz0r for this) a cloner. This cloner directly clones an object that you select. If it's a part, model, mesh, Gui, script, value, spawn location, or some other weird and wonderful thing, it copies it. The cool thing, it that if you're cloning an physical object, it will clone in the exact same space as the other one, in the exact same position. Which makes the next part easier...
A C-Framer. This cool little tool allows you to shift a part or a selection of parts positively or negatively along the Z, Y and Z axis by increments of 0.01, 0.1, 1 and 10. It also lets you rotate parts or a selection of parts along their X, Y and Z axis negatively or positively by increments of 0.01, 0.1, 1 and 10 degrees. Note that it will not shift models or spawn locations, only Parts, CornerWedgeParts, and WedgeParts. If you want to shift an entire model (and I don't see why you would) then right click it and click 'Select children', wait for them all to get selected, and then do it.
Disclaimer: please read the terms and conditions before use. By using this plugin you signify your acceptance and understanding of them.
A 'Title' button with the cReate logo (tiny, I know) and text. It doesn't do anything. YET. Contact me and tell me what it should do!
Second, we have the button to create a Medium stone grey, 3x3x3, anchored, ConCollide part that is not locked, smooth on all surfaces, with a Symmetrical FormFactor. It appears wherever the camera is looking.
Third, we have a button to create a neutral, 6x1.2x6 spawn, decal on top, welds on all sides bar the top, which is smooth. All other settings are default. It has inside it a decal, which is the standard spawn location decal. Team is set to neutral. What will you use your spawn for?
Next, we have the create mesh button. It creates the 3 meshes; Special, Block, and Cylinder. It creates them in Workspace, ready to be dragged into parts. Default settings for meshes.
Next up, a button to instantly create a script. It is created in Workspace, is blank and ready for editing.
Sixth, we have a button to create a blank, textless Message and Hint in the Workspace. Default settings.
Seventh, and this is cool, a button to create the basis of a GUI. It will create a ScreenGui object within the StarterGui. Within that will be a Frame, and within that will be a TextBox. There is also, in the frame, a TextButton, with a script for editing inside There is also a TextLabel. What's really cool, with recent updates, is that I have made it so it looks a little like this.
Now we have ourselves a great little button to create a team! It creates it in the Teams folder, and if there isn't one already, it'll create one! Settings are default, apart from the color, which is set to a random color for you. Have fun using this in conjunction with the Spawn Creator! Please thank ROBLOX user maxlocke99 for this great little tool!
Next up is a Skybox selector/creator. It pops up with a GUI offering you 4 cool Skybox's, plus the standard. More to come. Contact me with your own Skybox submissions!
Now, (and thank ROBLOX user AntiBoomz0r for this) a cloner. This cloner directly clones an object that you select. If it's a part, model, mesh, Gui, script, value, spawn location, or some other weird and wonderful thing, it copies it. The cool thing, it that if you're cloning an physical object, it will clone in the exact same space as the other one, in the exact same position. Which makes the next part easier...
A C-Framer. This cool little tool allows you to shift a part or a selection of parts positively or negatively along the Z, Y and Z axis by increments of 0.01, 0.1, 1 and 10. It also lets you rotate parts or a selection of parts along their X, Y and Z axis negatively or positively by increments of 0.01, 0.1, 1 and 10 degrees. Note that it will not shift models or spawn locations, only Parts, CornerWedgeParts, and WedgeParts. If you want to shift an entire model (and I don't see why you would) then right click it and click 'Select children', wait for them all to get selected, and then do it.
Disclaimer: please read the terms and conditions before use. By using this plugin you signify your acceptance and understanding of them.
